React入門用に簡単なアプリケーション作ってみる
React入門系の記事はもう結構出尽くしてる感ありますがせっかくなので私も。
今回はReact v0.13RC2を使って↓のアプリケーションを写経してみます。(Authorは私ではありません)
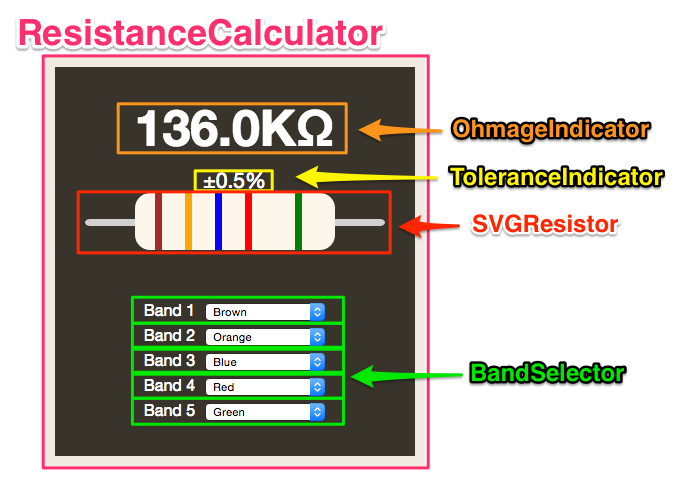
見ての通り、抵抗の値を計算するアプリケーションです。
Reactで書かれていたり、SVG使ってたり面白いソースですね。
ちなみに抵抗の色の仕様はこのようになってます。
はじめに
React v0.13RC2を使う理由は現時点で最新版ということと、v0.13.0beta1でES6のclass構文が使えるようになったからです。
jsfiddleのソースは1ファイルにまとめて書かれていますが、これを1コンポーネント1ファイルに分割して書いてみます。
React(JSX)のビルドにはBabelが使えるので、前回作ったスケルトンの上に作っていきます。
設計
jsfiddleのJSソースの一番下で、id="container"を持つ要素に<ResistanceCalculator />コンポーネントを埋め込んでいるので、ここをエントリーファイル(app.js)に記述すれば良さそうです。
今回はFluxの実装をしませんが、今後に備えてsrc/js以下にcomponentsというディレクトリを切り、ここに抵抗計算機を構成するコンポーネントを作っていきます。
抵抗計算機を構成する各コンポーネントはこのようになっています。

抵抗計算機は4つのサブコンポーネントから構成されており、
- OhmageIndicator ... 抵抗値計算結果を表示する
- ToleranceIndicator ... 誤差を表示する
- SVGResistor ... 抵抗を視覚的に表示する
- BandSelector ... 抵抗の色を選択する。Band1が左端、Band5が右端を示す
これらをまとめる大本のコンポーネントがResistanceCalculatorとして存在するようです。
それぞれのコンポーネントが何をしているのかわかったので、実装に移ります。
実装(写経)するに当たり、
- ES6のclass構文を使って書く
- idでスタイルを当てている部分をclassを使うよう変更する
ということをしました。
実装する
React v0.13.0 RC2のインストール
Reactをビルドする環境自体はスケルトンによって整っていますが、肝心のReactがまだ入っていないのでインストールしておいきます。
$ npm install -S react@0.13.0-rc2 # v0.13.0 RC2を指定する
エントリーファイルの作成
次にエントリーポイントとなるファイルを作成します。
このファイルではグローバル変数の定義や、抵抗計算機をDOMに埋め込む処理を行います。
// @file src/js/main.js

// グローバル変数で定義。CommonJS形式で読み込み
window.React = require('react')

import ResistanceCalculator from './components/ResistanceCalculator.js'

var calc = React.render(
  <ResistanceCalculator />,
  document.getElementById('container')
)
reactをES6modules形式で読み込むと参照が得られなかったので仕方なくCommonJS形式で読み込んでいます。
(react側がCommonJS形式だから..?)
window.Reactにreactを渡しているのはReactコンポーネントを作るときに各ファイルでReactへの参照を受け取るのが面倒だったからです。
ResistanceCalculatorの作成
ES6のclass構文使って書くとこんな感じになりました。
class構文で書き直すにあたり、kobaさんのこちらの記事がとても参考になりました。
React v0.13.0 Beta1でclassでComponentが作れるようになった - blog.koba04.com
// @file src/js/components/ResistanceCalculator.js

import OhmageIndicator from './OhmageIndicator.js'
import ToleranceIndicator from './ToleranceIndicator.js'
import SVGResistor from './SVGResistor.js'
import BandSelector from './BandSelector.js'

export default class ResistanceCalculator extends React.Component {

  constructor() {
    this.bandOptions = [
      { value: 0,  tolerance: 0,    color: "black",   label: "None" },
      { value: 1,  tolerance: 1,    color: "brown",   label: "Brown" },
      { value: 2,  tolerance: 2,    color: "red",     label: "Red" },
      { value: 3,                   color: "orange",  label: "Orange" },
      { value: 4,                   color: "yellow",  label: "Yellow" },
      { value: 5,  tolerance: 0.5,  color: "green",   label: "Green" },
      { value: 6,  tolerance: 0.25, color: "blue",    label: "Blue" },
      { value: 7,  tolerance: 0.10, color: "violet",  label: "Violet" },
      { value: 8,  tolerance: 0.05, color: "grey",    label: "Grey" },
      { value: 9,                   color: "white",   label: "White" },
      { value: 10, tolerance: 5,    color: "#ffd700", label: "Gold" },
      { value: 11, tolerance: 10,   color: "#c0c0c0", label: "Silver" },
    ]

    this.state = {
      bands: [0, 0, 0, 0, 0],
      resistance: 0,
      tolerance: 0,
    }
  }

  render() {
    return (
      <div className="calculator">
        <OhmageIndicator resistance={this.state.resistance} />
        <ToleranceIndicator tolerance={this.state.tolerance} />
        <SVGResistor
          bandOptions={this.bandOptions}
          bands={this.state.bands} />
        <BandSelector
          bandOptions={this.bandOptions}
          omitOptions={[10, 11]}
          band={1}
          changeHandler={this.updateBandState.bind(this)} />
        <BandSelector
          bandOptions={this.bandOptions}
          omitOptions={[10, 11]}
          band={2}
          changeHandler={this.updateBandState.bind(this)} />
        <BandSelector
          bandOptions={this.bandOptions}
          omitOptions={[10, 11]}
          band={3}
          changeHandler={this.updateBandState.bind(this)} />
        <BandSelector
          bandOptions={this.bandOptions}
          omitOptions={[8, 9]}
          band={4}
          changeHandler={this.updateBandState.bind(this)} />
        <BandSelector
          bandOptions={this.bandOptions}
          omitOptions={[3, 4, 9]}
          band={5}
          changeHandler={this.updateBandState.bind(this)} />
      </div>
    );
  }

  updateBandState(band, value) {
    var state = this.state

    state.bands[band] = value
    state.resistance = this.calculateResistance()
    state.tolerance = this.calculateTolerance()

    this.setState(state)
  }

  calculateResistance() {
    var resistance = this.getBaseResistance() * this.getMultiplier()

    return resistance
  }

  calculateTolerance() {
    return this.bandOptions[this.state.bands[4]].tolerance
  }

  getBaseResistance() {
    return (100 * this.state.bands[0]) +
      (10 * this.state.bands[1]) + (1 * this.state.bands[2])
  }

  getMultiplier() {
    if (this.state.bands[3] == 10) {
      return 0.1
    }

    if (this.state.bands[3] == 11) {
      return 0.01
    }

    return Math.pow(10, this.state.bands[3])
  }
}
Reactコンポーネントのクラスを作るときはclass Hoge extends React.Componentとして作成します。
Reactコンポーネントの初期化時に実行されていたgetInitialState()はconstructor()で記述すれば良いようです。
クラスに値を持たせたい場合はコンストラクタ内でthis.hoge = {}のように記述します。
Reactコンポーネントでよく使うstateを定義する場合も、同様にコンストラクタ内で定義します。
render()では抵抗計算機のUIの通りに上から順番にコンポーネントを読み込みます。
この部分のシンタックスはJSXと呼ばれているものですが、慣れればなんてことはありません。
HTMLのタグ名のようにReactコンポーネントクラスを指定して、HTMLの属性値のようにpropsを渡すだけです。
propsの値は{}で囲んであげる必要があります。
BandSelector(抵抗の色選択をするセレクトボックス)のpropsにchangeHandlerとして関数を渡しているのですが、そのまま
changeHandler={this.updateBandState}
を渡すとコンテキストがおかしくなるので
changeHandler={this.updateBandState.bind(this)}
とコンテキストを指定しなければならないことに注意です。(ハマりました)
サブコンポーネントの作成
あまり補足することもないのでソースを載せます。
OhmageIndicator
// @file src/js/components/OhmageIndicator.js

export default class OhmageIndicator extends React.Component {

  render() {
    return (
      <p className="resistorValue">{this.printResistance()}</p>
    );
  }

  printResistance() {
    var resistance = parseFloat(this.props.resistance)

    if (resistance > 1000000) {
      return(resistance / 1000000).toFixed(1) + "MΩ"
    }

    if (resistance > 1000) {
      return (resistance / 100).toFixed(1) + "KΩ"
    }

    return resistance.toFixed(1) + "Ω"
  }
}
ToleranceIndicator
// @file src/js/components/ToleranceIndicator.js

export default class ToleranceIndicator extends React.Component {

  render() {
    return (
      <p className="toleranceValue">{this.printTolerance()}</p>
    );
  }

  printTolerance() {
    return this.props.tolerance === 0 ? "" : "±" + this.props.tolerance + "%"
  }
}
SVGResistor
// @file src/js/components/SVGRegistor.js

export default class SVGRegistor extends React.Component {

  render() {
    return (
      <svg width={300} height={100} version="1.1" xmlns="http://www.w3.org/2000/svg">
        <rect x={0} y={26} rx={5} width={300} height={7} fill="#d1d1d1" />
        <rect x={50} y={0} rx={15} width={200} height={57} fill="#fdf7eb" />
        <rect id="band1" x={70} y={0} rx={0} width={7} height={57} fill={this.valueToColour(this.props.bands[0])} />
        <rect id="band2" x={100} y={0} rx={0} width={7} height={57} fill={this.valueToColour(this.props.bands[1])} />
        <rect id="band3" x={130} y={0} rx={0} width={7} height={57} fill={this.valueToColour(this.props.bands[2])} />
        <rect id="band4" x={160} y={0} rx={0} width={7} height={57} fill={this.valueToColour(this.props.bands[3])} />
        <rect id="band5" x={210} y={0} rx={0} width={7} height={57} fill={this.valueToColour(this.props.bands[4])} />
      </svg>
    )
  }

  valueToColour(value) {
    return this.props.bandOptions[value].color
  }
}
BandSelector
// @file src/js/components/BandSelector.js

export default class BandSelector extends React.Component {

  constructor() {
    this.state = { selected: 0 }
  }

  render() {
    var optionNodes = this.props.bandOptions.map((option) => {
      if (this.props.omitOptions.indexOf(option.value) === -1) {
        return <option key={option.value} value={option.value}>{option.label}</option>
      }
    })

    return (
      <div className="bandOption">
        <label>Band {this.props.band}</label>
        <select
          ref="menu"
          value={this.state.selected}
          onChange={this.handleChange.bind(this)}>
          {optionNodes}
        </select>
      </div>
    )
  }

  handleChange(e) {
    var newValue = this.refs.menu.getDOMNode().value

    this.setState({ selected: newValue })
    this.props.changeHandler(this.props.band - 1, newValue)
  }
}
BandSelectorのコンストラクタではstateの定義しかしていません。
super()で親のコンストラクタを呼ばなくてもpropsがちゃんと保持できていたのでこのように書いてますが、ちょっと気持ち悪いかも。
TypeScript的にちゃんと書くのであればこのように書きます。
  constructor(props) {
    super(props, this)
    this.state = { selected: 0 }
  }
render()の先頭ではselectタグの子要素であるoptionタグを動的に作っています。
動的にリスト要素を作成するときはkeyプロパティを渡さないとWARNが出るようです。
要素を断定できるユニークなキーを渡せば良いようなのでここでは適当にoption.valueを渡しています。
所感
構文について
ES6のclass構文使うとfunctionと書かなくて良いので見た目がすっきりしますが、Reactコンポーネントを作るときに関して言うとまだ使いにくいかも。
propTypesでそのコンポーネントで必要なpropsの型を明示できますが、今のままだとconstructor()内でthis.propTypes = {}と書くしかありません。
この書き方をしてみると、クラスの型情報をインスタンス変数として持つのは無駄みたいなWARNが出ました。。
今後の改善に期待です。
componentsディレクトリについて
現状はReact.Componentを継承したクラスは全てcomponentsディレクトリ以下においてますが、今後たくさん増えることが予想されるので1モジュールごとにサブディレクトリを作った方がいいのかもしれません。
# 現状はこうなってるけど
src/js
├── app.js
└── components
    ├── BandSelector.js
    ├── OhmageIndicator.js
    ├── ResistanceCalculator.js
    ├── SVGResistor.js
    └── ToleranceIndicator.js

# こんなかんじにしたほうがよい?
src/js
├── app.js
└── components
    └── ResistanceCalculator
        ├── index.js (ResistanceCalculator.js)
        ├── BandSelector.js
        ├── OhmageIndicator.js
        ├── SVGResistor.js
        └── ToleranceIndicator.js
Fluxについて
親子間のコンポーネントのやりとりはまだ許容できますが、もし2つの抵抗計算機を連携させて並列回路の抵抗の合計を計算するといったものを作ることになったらFluxで実装すると思います。
1モジュール内でのやりとりはなるべくモジュール内で完結させて、モジュールの移植性を高めるといいかも、と思いました。
Fluxについてはまだ練度が低いので、いろいろ目を通してベストプラクティスを見つけていきたい。
おわりに
今回はすでに動くものがあり、それをES6構文で動くように写経するってことをやったのでReactについて結構理解できた気がします。
最終的なコードはこちらに上げておきました。
GitHub - sskyu/react-registanceCalculator
gulpを入れて、$ npm installして、$ gulpとするとlocalhost:8000で立ち上がります。
まだテストの仕組みを作れていないのでそろそろどうにかしたい。
React解説記事など
たくさんあるけどこの辺を読むと分かりやすかった。
一人React.js Advent Calendar 2014 - Qiita
今話題のReact.jsはどのようなWebアプリケーションに適しているか? Introduction To React─ Frontrend Conference | HTML5Experts.jp